


Creating a sitemap is like handing a GPS to Google. It ensures that every important corner of your site is discovered, crawled, and indexed. In 2026, search engines prioritize dynamic XML sitemaps that update automatically when you publish new content.

How to Create a Sitemap for Blogger (BlogSpot)
Creating a blog on blogspot is really cost-saving. However, it lacks many features that wordpress does. Therefore, Blogger creates a basic sitemap (it does not mean low quality) for you automatically. However, for maximum “rank-friendliness,” you should use the one specifically built for search engines like Google, Yahoo, Yandex, and Bing.
Step 1: Locate your default sitemap
If you know or not, Blogger automatically generates a sitemap at your domain followed by sitemap.xml
Here is an example: https://yourblogname.blogspot.com/sitemap.xml if you are using a custom site address, like nextlevelblogger.com, your sitemap will look like this: https://nextlevelblogger.com/sitemap.xml However, if you are using a plugin in wordpress, that sitemap will look different than the above as per your plugin configurations. In short, we need a sitemap that is quick to update the search engine bot and accelerate fast indexing.
Pro tip: Use feedburner sitemap; it is still working for most of the website, and they are fast and reliable. Also, every week, submit your sitemap even though they already exist. by doing so, they keep fresh and relevant and keep your site pushing for indexing. Furthermore, keep editing and rewriting your past posts; even a single word you update in your post keeps your sitemap fresh and signals to the search engine line Google that the site is active.
Step 2: Enable Custom Robots.txt (Optional but Recommended)
- Log in to Blogger Dashboard > Settings.
- Scroll down to Crawlers and indexing.
- Turn on Enable custom robots.txt.
- In the “Custom robots.txt” field, add the following to point crawlers to your sitemap:
User-agent: *
Disallow: /search
Sitemap: https://yourblogname.blogspot.com/sitemap.xmlNote: This piece of code that is called robots.txt helps Google understand your site’s important pages and indexing priority.
How to Create a Sitemap for WordPress
The world’s most popular CMS, WordPress, is more flexible than any other content management system. I know many of you are using the old sitemap, and they are very slow. Today, I bring something very interesting: a sitemap setting that you probably may not have added to your search console.
Therefore, it has a built-in basic sitemap (/wp-sitemap.xml), it is highly recommended to use a plugin for better SEO control.
Option A: Using Rank Math (Recommended for 2026)
Probably you must be asking me what the most simple and reliable plugin is. My personal experience says Yoast SEO. However, If you want to implement schema on your site, Rank Math is another next-level plugin and currently the most efficient “index-friendly” plugin because it handles images and custom post types natively. So, here in wordpress, some sitemap generates under sitemap_index.xml.
- Install & Activate: Go to Plugins > Add New > search for “Rank Math.”
- Setup: During the setup wizard, ensure “Sitemaps” is toggled On.
- Configure: Go to Rank Math > Sitemap Settings.
- Include Images (crucial for Google Image ranking).
- Exclude “No-index” pages (like your login page) to keep the sitemap clean.
- Find your URL: It is usually
yourdomain.com/sitemap_index.xml.
Option B: Using Yoast SEO
- Install: Search for “Yoast SEO” in the WordPress plugin directory.
- Enable: Go to Yoast SEO > Settings > Site features.
- Toggle: Scroll down to XML Sitemaps and make sure it is “On.”
- View: Click the “See the XML sitemap” link to verify it works.
Making it “Rank and Index Friendly”
This is a very crucial part, and most of them ignore it or do not take it seriously. As a result, many bloggers lost the traffic due to indexing. They have good content but very little technical knowledge. To ensure your sitemap actually helps your SEO, follow these 2026 best practices I have discussed today.
- Keep it clean: Only include “200 OK” pages. Never include 404 (broken), 301 (redirected), or “noindex” pages.
- Update “lastmod” dates: Ensure your sitemap shows when a post was last modified. This tells Google to re-crawl updated content.
- Mind the size: Google has a limit of 50,000 URLs or 50MB per sitemap. If you are larger, use a Sitemap Index (which both Rank Math and Yoast do automatically).
- Image Sitemaps: Always include images in your sitemap to rank in visual search results.
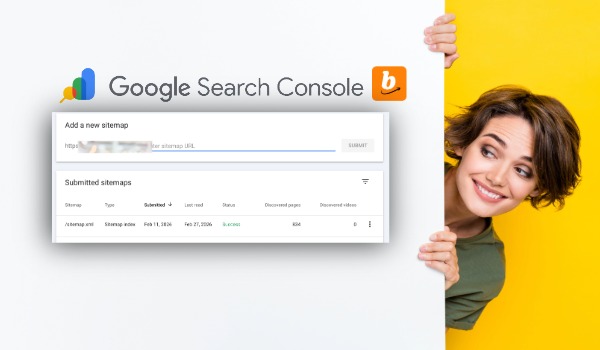
Submitting to Google Search Console (Final Step)
When you created the site maps and optimized the robot.txt file, everything worked when you added them to the Search Console of your search engine. Addition to this, creating the sitemap is only half the job; you must tell Google where it is.
- Go to Google Search Console.
- Select your website property.
- Click on Sitemaps in the left-hand menu.
- Under Add a new sitemap, enter the last part of your sitemap URL:
- For Blogger:
sitemap.xml - For WordPress:
sitemap_index.xml
- For Blogger:
- Click Submit.
Pro Tip: Check back in 48 hours. If you see a green “Success” status, you’re good. If you see “Couldn’t fetch,” double-check that your site isn’t accidentally blocking crawlers via the
robots.txtfile.

